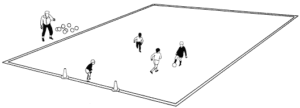
1v1v1

1v1v1

1v1v1Game Rules

One ball for three players in the area shown in the diagram, approximately 15 yards square.

Each player plays against the other two players.

Each player tries to score in a goal four to five yards wide.

When the ball goes out of play, the coach puts another ball in play.

Goalkeeper making a save throws the ball to the coach.

After 10 balls are served, all three players and the goalkeeper are changed.

Keep score and play the winners against each other to name the champion.

Player Objectives

Control the ball from the coach.

Manipulate the ball to avoid challenges.

Shield the ball when necessary.

Change direction – turn with the ball.

Change pace.

Shoot at the earliest opportunity.

Inside, outside

This is an effective pre-match soccer warm-up, as well as a good way to improve ball skills in training sessions for players of all ages.

Objective:

To improve passing and receiving skills.

Skill level:

Beginners and upwards.

Number of players:

The whole squad.

Set up:

Create a circular playing area at least 20 yards in diameter. The bigger the area, the harder your players will have to work. Smaller areas will require more skill.

How to play:

Half the players are equally spaced around the edge of the circle with a ball. The other half work inside the circle. On your command, the players in the circle run to a player on the outside, receive a pass and pass back.

Players then run quickly to another player on the outside and repeat.

Play for a minute and then swap roles. Give each team two or three turns as an inside and outside player.

Coaching points:

  • Ask your players to work at pace. They should turn and run quickly.
  • As the inside players approach an outside player, they should call for the ball, loudly.
  • The players on the outside of the circle need to stay on their toes and not let return passes go past them.

Variations:

  • Outside players can hold the ball in their hands and serve it at varying heights and speeds.
  • The players on the inside have a ball each. They dribble to an outside player, pass to them, get a return pass and dribble at speed to another outside player. Repeat.

Throw ins

Everyone in your team must be able to throw the ball in. Don’t opt for dedicated throwers.

In youth football (soccer) nearly 70 per cent of throw-ins are foul throws and the ball is lost to the other team. It seems young teams might be better off kicking the ball out of bounds and stealing the ensuing throw-in.

To reverse these odds, every player on your team must be prepared to execute a proper throw-in and get the ball into play almost immediately. A sudden restart can catch the defence off-balance and greatly increases the odds of keeping possession, and offers a chance to get behind the defence and make a run on goal.

The basic technique:

1. Hold the ball behind your head. Your hands should be behind the ball and the fingers spread so that your hands look like the letter ‘W’.

2. Stand a few inches behind the sideline with your feet together and about a shoulder width apart – I advise against taking a run up or having one foot behind the other. If your players do this they will almost certainly lift their back foot off the ground. If that happens the ref will call a foul and give the throw to the opposition.

3. Scan the field – where are your players? If you throw the ball to them will they have time to control it before an opposing team player closes them down?

4. If you need to throw the ball a long way it helps if you bend your back as the ball is released.

5. A throw in is a pass the same as any other – so be accurate and don’t throw it too hard.

6. Immediately look to support the receiving player.

7. Be decisive. The longer you wait, the harder it will be to find someone to throw to. Try to throw the ball back into play as quickly you can.

If you want your team to take quick, effective throw-ins you have to practise them. They won’t happen otherwise!

The easiest way to do this is to demonstrate the right technique, then play a small-sided match. Every time the ball goes out (even for goal kicks and corners) the game is restarted with a throw-in.

Make sure there’s a lot of movement from the players on the pitch and the throw is taken as quickly as possible; if the throw isn’t taken in X number of seconds give it to the opposition.

Take advantage of opponents

While teaching players to get the ball back into play quickly hardly seems like rocket science, simple things done correctly at the U-10 level and below are extremely effective. Marking off the ball is one of the weakest areas of youth football, and a quick-thinking player can take advantage of opponents not only during the run of play, but on restarts as well.

Don’t go for designated throwers

Some coaches rely on one or two players to take all throw-ins. We’ll call them designated throwers. The designated thrower is the most exhausted player on the field. The designated thrower is required to sprint up and down the sideline, or even across the field, to take a simple throw in. Most adults would soon collapse under such a pace, but it is routinely required of U-10s with shorter legs and smaller lungs.

Let them all throw it

All too often, when a ball is knocked out of bounds upfield, a quick-thinking forward prepares to toss it back in play, only to be halted by her coach. “Why can’t I take the throw?” protests the confused forward. “Because you’re not a midfielder,” yells the coach. “Only the midfielders take throws.”

Five tips for quick throw-ins

Quick throw-ins increase the chances of your team scoring goals.
Make sure every player on your team knows how to take a throw-in.
Don’t slow the game down by calling for a designated thrower.
Throw the ball towards the opposition goal “down the line”.
Don’t stop players who are first to the ball from taking quick throw-ins.

In touch with the ball

While a quick throw may lead to a great scoring chance or two, the impact of this tactic goes far beyond the win-loss column. In age groups where games may last only 50 or 60 minutes, too much time is wasted just putting the ball back into play. Young players must touch the ball as much as possible.

Teaching tactical awareness

Coaches who emphasize quick throws also play an important role in teaching tactical awareness to their opponents. Teams defending against a designated thrower usually have at least 20 or 30 seconds to drop back behind the ball. Casual defending against sudden restarts will not work.

Take time and teach skills

Since skills, experience and endurance are limited at the lower age groups, young players should never be asked to do the impossible. Coaches who truly care about preparing young players for a higher level of play should take time to teach every beginner how to execute a proper throw-in.

Once that is accomplished, throw the ball back on the field and let the kids play.

Position or team shape?

How many times have you heard a coach or parent call out “John, remember your position!” or “John, you’re supposed to be playing fullback!” during a game? How many times have you done it yourself? I’ll plead guilty right away. Sometimes it seems like coaches (and some parents) are obsessed with getting the kids to play position. Is this ok or are we making unreasonable demands on the kids and as a result spoiling their enjoyment of the game? Remember, in AYSO, the game is for the players, not the coaches or parents. The short answer is that there is no short answer, but in this note I will try to cast some light on the matter, and perhaps help you see the issue of playing position from a different perspective, that of “team shape”.

First, the answer depends a great deal on the age of the kids. I would expect that by 12-14, most players understand why positional play is important and what the field positions are, but I would not expect everybody to succeed in translating that into actual game play until 14-16. In contrast, at age 5, I would expect no understanding and no interest at all in playing position. Obviously sometime between ages 5 and14, coaches are expected to teach positional play and (we hope) that the players will catch on. The key question is when and why? My belief, based on many years of coaching this age group, is that we generally try to do this too early, and that this is the root cause of a lot of the sideline shouting on the subject. Sadly it sometimes also leads coaches to teach bad habits that become a liability in later years.

Anyone who has watched 11-a-side (or even 7-a-side) at the 6-8 age is familiar with the “swarm” – everybody chasing the ball and nobody playing position. In contrast, you may also have seen players standing in fixed positions on the field, especially defenders standing on the edge of the penalty area. Which mode of play is more fun? Since the kids will chase the ball if given the chance I think the answer is the swarm. It is obvious which is better exercise. You might be surprised that I also believe that the swarm is better at developing soccer ability. But isn’t it important that the kids learn to play position? Certainly, but not until it is necessary, and definitely not at the expense of developing the basic instincts that a soccer player needs. If I had to pick the most important characteristic of a good soccer player, it would be “hustle” – the desire to win the ball, get open for passes and deny opponents space to play or receive the ball. These abilities can go a long way to make up for pure soccer skills. Every coach loves a player with hustle! Yet it’s hard to teach, especially if the formative years are spent standing around playing position!

Playing position only matters once the skill level and mental development of the kids has risen to the point where it makes sense to them and is also actually useful in the game. This happens rather later then most people think, not usually before the age of nine in average kids. Defensively, the need to play position arises once the opposition can kick the ball a long distance or can dribble or pass out of the swarm and break away. In either case it becomes more important for the defensive team to cover the strategic areas of the field. As defensive abilities improve, the offensive team has to pass the ball to find open space and try to isolate defenders one-on-one. This requires that the players spread out and stretch the defence. Once players mature enough to loft the ball thirty yards or more, as happens between age eleven and fourteen on average, good positional organization becomes very important, both offensively and defensively. But playing position away from the ball requires mental maturity, putting team before self, something that also only develops in the early teen years. Fortunately the game moves much faster at this level and frequent changes of direction and location of play occur, so that participation is ensured for everyone, even when playing position. This is simply not the case in the younger age groups and playing position often literally means no touches of the ball for long periods. This can’t be right for young players.

If you watch a top-level game, you will see that the players position themselves so that the team as a whole has a definite “shape”, with the players generally spaced evenly in that shape, so as to cover the whole territory. As the game develops, players are constantly adjusting their positions relative to one another and to the actual play. On defence the shape contracts in an attempt to deny space and put more players near the ball (a kind of swarm!). On offence the team shape expands to try to create space and break the shape of the defence. What you will hardly ever see is a player standing still. Players are constantly in motion, fine-tuning their position, covering for their teammates and compensating for changes in the opponents’ strategy. The offside law plays a key role in encouraging a compact shape on defence. By making it illegal to for an opponent to receive the ball in an offside position behind the defence, the law encourages defences to push towards their opponents’ goal and limit the space for their opponents to play in. This is another reason why teaching defending players to stand on their penalty area is wrong – it allows the opposition to freely use the space between the half-way line and the penalty area without the risk of being offside and develops a bad defensive habit that is hard to break later.

Team shape is what I concentrate on when introducing positional play. More than anything else, I want the players to “stay connected” as a unit and not break into separate groups. I want the whole team involved all of the time, so I am always encouraging my defence to move up the field to at least the half-way line when we are attacking. Sometimes my team will give up goals on breakaways that might have been prevented by having the defence on the penalty area. That’s a small price to pay for teaching the right long-term strategy and having all my team involved in the game.

Many of the difficulties of teaching positional play are made worse by playing too many players on a team, because this increases the “need” to assign them positions in an attempt to avert the swarm. The right answer is to adjust the number of players on the team to the development level of the players! AYSO National is committed to reducing team sizes in the younger age groups and we are in the forefront of this process in the Palo Alto region. In 1998 we introduced the 4-a-side program for the boys Under-7 age group and it has been very successful. It has many benefits, not least that teaching positional play is a non-problem by design. In the 2000 season, 4-a-side was extended to both the Under-8 and Under-7 divisions, and 7-a-side was introduced for the Under-10 and Under-9 divisions. In 2002, the Under-9 divisions switched to 5-a-side, as the jump to 7-a-side was too much for many players. The gradual increase from 4 to 5 to 7 players allows coaches to teach the beginnings of positional play, without becoming overwhelmed by the complexities of 11-a-side.

Eight soccer coaching warm ups for young players

warmupsman2Young children (up to the age of eight) hardly need to warm up at all – some jogging, swinging of the arms, twists of the hips or other movements to loosen up will suffice.

Older children need some easy stretches interspersed by some gentle jogging to warm their muscles and raise their heart rate.

Note: It is important to establish good training habits as soon as possible. Therefore, emphasis should be placed upon developing a consistent routine. Don’t have a warm up one week but drop it the next because you’re a bit short of time!

Stretching exercises at any age can be harmful if the muscles are cold so start your warm up with some gentle jogging (with or without a football) before moving onto appropriate stretching exercises.

Try one or more of these quick and simple games to get your kids focused and ready to work.

Reaction Warm-Up

This is a good warm-up exercise that warms up the brain as well as the feet. Having tried it out on my team you soon find out who can think quickly – and also who knows their left from their right!

Set-Up
Make a circle with markers – one for each player.

If you have a large number of players, make two (or three) circles.

The size of the circle will depend on the age of your team and how much of a work-out you want to give them – but even a small circle is good enough if you do the drill at pace.
Procedure

Couldn’t be simpler – you just shout out instructions!

“2 left”

“3 right, 1 left”

“2 right, centre, 1 left”

(Centre means run to the middle of the circle AND BACK)

Variations

The drill can be done with or without a ball.

Specify the type of steps they have to use between each marker, i.e., sidesteps or turn and run.

Have them sit down after each instruction – then they get to practice getting on their feet quickly (or get trampled!)
Points to Watch

Make sure your kids are on their toes ready to move – no standing flat-footed.

Every step touch the ball

Players dribble a football slowly in a defined area. Then tell them to try to touch the football with every step they take – (not as easy as it sounds!). On the command ‘Go’, the players must leave their ball and find another. Let them try this a few times then take one or two balls away. The players who end up without a ball have to run a lap of the activity area.

Spiders and bugs

Mark three lines 20 yards long and fifteen yards apart as shown by the x’s in the diagram below.

Warm up

Divide your children into two equal teams. Each team should stand along side the centre line about two yards apart and all facing forwards. Name one team Spiders (the ‘S’ in the diagram above) and one team Bugs (the ‘B’s). When you call ‘Spiders’! or ‘Bugs’! that team has to sprint for the end line nearest them. The other team tries to tag them. Anyone who is tagged joins the other team. Continue until there are only a couple of children left who haven’t been tagged. Don’t carry on until they are all exhausted!).

Pass and follow

A player in the centre of the circle passes to a player standing on the outside of the circle. She follows her pass and exchanges places with the player she passed to. That player then dribbles into the centre of the circle and passes to another player on the outside. As the players improve, put another ball into play and/or impose restrictions (one-touch play, alternate side-of-the-foot and lofted passes, etc).

You could also try putting half the players on the outside of the circle and half on the inside. The players on the inside look to the players on the outside for a thrown-in ball, receive it and one-touch it back (vary the service so that the ball is thrown to feet, to thigh, to chest, to head).

The Zipper Drill

Zipper drill

This drill is very good for observation and co-ordination.

Organisation

Grid can be determined by the age of the players. 20yds x 20yds is the normal.

Divide team into two groups here blues and greens. Players start on cone A and run down to cone B doing whatever is asked of them. When they pass cone B they run diagonally to the opposite corner and cross the other group, they now start from cone A again.

Progression

  • Players bump into each other in the middle and sprint to A
  • Turn before the Zip
  • Introduce a ball.
  • Exercises (from A to B)
  • Slow Jogging.
  • Stop, turn.
  • Skipping.
  • Skipping Sideways.
  • Skipping Backwards.
  • Faster Jogging
  • Striding Out.
  • Slight changes of direction. Three steps to the right then three steps to the left.
  • High Knees.
  • Heel Flicks.
  • Sprinting.
  • Jump and Head.
  • Turn and Sprint.
  • Backing Off.
  • Jockeying.

Quick reactions

Organisation

Players line up behind each other in a straight line with cones ten yards away on their left and right. The coach stands opposite them and shouts instructions. The players run to the line of cones indicated by the coach.

Moves:

  • Skip
  • Run
  • Dribble with ball (leave on line or take back).
  • Run with ball in hands (leave on line or take back).

Players can react from:

  • Voice
  • Signal
  • Shouting colours (blue is left, green is right).
  • Numbers odd numbers and even numbers.
  • Opposites

Switch Ball

Switch ball

Organisation

Grid is 30 x 30 yards, you can even use the centre circle. Use 10+ players.

Three players are in the middle of a 30 x 30 yard grid. The remaining players make a circle around the grid. Five of these players each have a ball.

Each player in the middle moves to a player with a ball, receives it, turns and switches it to a team mate who does not have a ball. Play continues in this fashion for a designated period.
Variations

Allow two touches for the players in the middle.

The switched ball has to be chipped in the air.

Add a defender to mark players in the middle.

Rotate middle and circle players.


Two final words about warm ups – NO LAPS!

I cringe whenever I see a coach watching her children run round and round the field. Why?

Because I know that I’m watching a coach who doesn’t know what she is going to do next – the children are running laps so that she can have a think.

Some coaches may say “Yes, but I make them dribble while they run the lap.”

Is this (as the Dutch would say) a ‘soccer like’ activity? No. Is it a situation that children are likely to encounter during a match? No, it’s not.

So…no laps!

And don’t forget the cool down!

Why play small sided games?

1. Because we want our young football (soccer) players to touch the soccer ball more often and become more skilful with it! (individual technical development)

2. Because we want our young soccer players to make more, less-complicated decisions during the game! (tactical development)

small sided games are fun!3. Because we want our young soccer players to be more physically efficient in the field space they are playing in! (reduced field size)

4. Because we want our young soccer players to have more individual teaching time with the coach! Less players on the field and less players on the team will guarantee this! (need to feel worthy and need to feel important)

5. Because we want our young soccer players to have more, involved playing time in the game! (more opportunity to solve problems that only the game presents)

6. Because we want our young soccer players to have more opportunity to play on both sides of the ball! (more exposure to attacking and defending situations)

7. Because we want our young soccer players to have more opportunities to score goals! (pure excitement)

Best of all, the game is simple, can be played without adult involvement and it’s FUN!

These are the reasons why we adults must foster “Small-Sided Games” in our youth soccer programs. The “Small-Sided” environment is a developmentally appropriate environment for our young soccer players. It’s a FUN environment that focuses on the young soccer player.